Deploy Starbucks Clone with DevSecOps

DevOps | Cloud Practitioner | AWS | GIT | Kubernetes | Terraform | ArgoCD | Gitlab
DevSecOps integrates security into the development process. This approach ensures that security is considered at every stage of the software lifecycle, from design to deployment.
This proactive strategy helps in creating more secure applications while maintaining development speed and efficiency.
Deployment Stages to Build a Starbucks Clone
Git Checkout: Start by checking out the code from GitHub. This ensures you have the latest version of the project.
SonarQube Analysis: Run SonarQube to identify any vulnerabilities in the code. This step is crucial for maintaining security and code quality.
Quality Gate: Use the Quality Gate feature to scan the repository for security issues. It acts as a checkpoint to ensure the code meets certain standards before moving forward.
Trivy Scan: Utilize Trivy to scan the files for any potential threats. This tool helps in identifying vulnerabilities early in the process.
Build Docker Image: Create a Docker image of the application. This image will serve as the deployable unit for the application.
Tag and Push Image to DockerHub: Tag the Docker image appropriately and push it to DockerHub. This step makes the image available for deployment.
Docker Scout Image: Use Docker Scout to inspect the image for any issues or vulnerabilities. This ensures the image is safe and ready for deployment.
Deploy to Container: Finally, deploy the container using the Docker image we built. This step brings the application to life, making it accessible for use.
Steps to Deploy Starbucks Clone App on EC2
Create EC2 Instance:
Configure a
t2.xlargeinstance with Ubuntu and attach 30GB of General Purpose SSD or Magnetic Storage.Set up security groups to allow access to various ports:
TCP 22: SSH access to the EC2 instance.
TCP 8080: Jenkins access.
TCP 9000: SonarQube access.
TCP 3000: Access the React and NodeJS app.
Configure EC2 Ubuntu Instance:
Install AWS CLI:
  bashCopysudo apt install unzip -y
  curl "https://awscli.amazonaws.com/awscli-exe-linux-x86_64.zip" -o "awscliv2.zip"
  unzip awscliv2.zip
  sudo ./aws/install
Install Jenkins on Ubuntu:
  bashCopysudo apt update -y
  wget -O - https://packages.adoptium.net/artifactory/api/gpg/key/public | sudo tee /etc/apt/keyrings/adoptium.asc
  echo "deb [signed-by=/etc/apt/keyrings/adoptium.asc] https://packages.adoptium.net/artifactory/deb $(awk -F= '/^VERSION_CODENAME/{print$2}' /etc/os-release) main" | sudo tee /etc/apt/sources.list.d/adoptium.list
  sudo apt update -y
  sudo apt install temurin-17-jdk -y
  curl -fsSL https://pkg.jenkins.io/debian-stable/jenkins.io-2023.key | sudo tee /usr/share/keyrings/jenkins-keyring.asc > /dev/null
  echo deb [signed-by=/usr/share/keyrings/jenkins-keyring.asc] https://pkg.jenkins.io/debian-stable binary/ | sudo tee /etc/apt/sources.list.d/jenkins.list > /dev/null
  sudo apt-get update -y
  sudo apt-get install jenkins -y
  sudo systemctl start jenkins
  sudo systemctl status jenkins
Install Docker:
  bashCopysudo apt-get update
  sudo apt-get install ca-certificates curl
  sudo install -m 0755 -d /etc/apt/keyrings
  sudo curl -fsSL https://download.docker.com/linux/ubuntu/gpg -o /etc/apt/keyrings/docker.asc
  sudo chmod a+r /etc/apt/keyrings/docker.asc
  echo "deb [arch=$(dpkg --print-architecture) signed-by=/etc/apt/keyrings/docker.asc] https://download.docker.com/linux/ubuntu $(. /etc/os-release && echo "$VERSION_CODENAME") stable" | sudo tee /etc/apt/sources.list.d/docker.list > /dev/null
  sudo apt-get update
  sudo apt-get install docker-ce docker-ce-cli containerd.io docker-buildx-plugin docker-compose-plugin -y
  sudo usermod -aG docker ubuntu
  sudo chmod 777 /var/run/docker.sock
  newgrp docker
  sudo systemctl status docker
Verify Installations: Check that Docker, AWS CLI, and Jenkins are properly installed:
 jenkins --version
 docker --version
 aws --version
Install Trivy Scan:
 sudo apt update
 sudo apt install -y curl apt-transport-https
 curl -sSfL https://github.com/aquasecurity/trivy/releases/latest/download/trivy_0.29.2_Linux-64bit.tar.gz | sudo tar -xz -C /usr/local/bin
 trivy --version
Installing Docker-Scout: to scan docker images
Login to DockerHub:
docker login -u <username>
Install Docker Scout:
curl -sSfL https://raw.githubusercontent.com/docker/scout-cli/main/install.sh | sudo sh -s -- -b /usr/local/binVerify the installation:
docker-scout version
Change the permissions of
docker.sock.
Installation Completed
Login to Jenkins and Setup Plugins
URL: http://localhost:8080 login Jenkins

Jenkins with SonarQube (with docker container)
Run the SonarQube with docker container:
docker run -d --name sonar -p 9000:9000 sonarqube:lts-community

Login to SonarQube : http://<IP-add>:9000

Integrate Sonarqube and Jenkins
Go to
Sonarqube > Administration
Go to
Configuration > Webhooks
Click on
Create:
We are all set: as you can see we successfully created webhook on sonarqube

Do same for jenkins → First create user in Sonarqube
Go to
Sonarqube > Security > user
Create a token in Administrator to authenticate jenkins

Login to Jenkins : to add sonarqube token in Jenkins
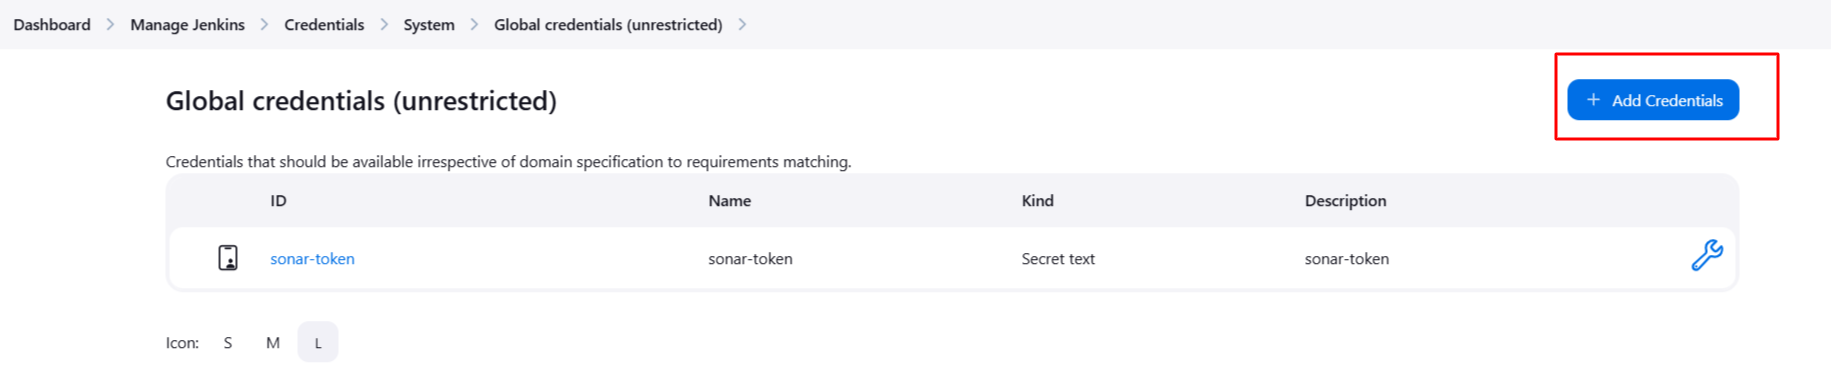
Go to
manage jenkins > CredentialsGo to
global > Add credentials
Click on
“add credentials”
Add credentials:
The one we copied the token from sonarqube

Go to
Jenkins > Manage Jenkins > Sonarqube Installation
Congrats! You have successfully integrated Sonar and Jenkins
Install Required Software ( Jenkins → Tools)
Git

JDK 17: The first thing you need is JDK 17. Download and install it. Name it
JDK 17and choose the appropriate version.
SonarQube Scanner: Add the
sonar-scannerplugin to Jenkins. This will help in static code analysis.
Node.js: Install Node.js version 16.20.0.

Dependency-Check: Install this from GitHub for your project’s security scanning.

Docker: Make sure Docker is installed, preferably the latest version.

Configure System Settings for SonarQube
In Jenkins, navigate to Manage Jenkins > Configure System.
For SonarQube:
Add a new SonarQube server.
Enter the SonarQube URL (e.g.,
http://localhost:9000).Provide the Authentication Token created in Jenkins credentials.
Set Up Gmail Email Notification
- Login to Gmail
For Gmail notifications, you’ll need to set up an app password for your Gmail account.

Log in to Gmail and create an app password by navigating to your Google Account > Security > App Passwords.
Use this app password when setting up email notifications in Jenkins.
Add to global credential in Jenkins with token
- Now go to Jenkins
In Manage Jenkins > Configure System, scroll to Extended Email Notification.
Set the SMTP server as
smtp.gmail.com.Port:
465(for SSL).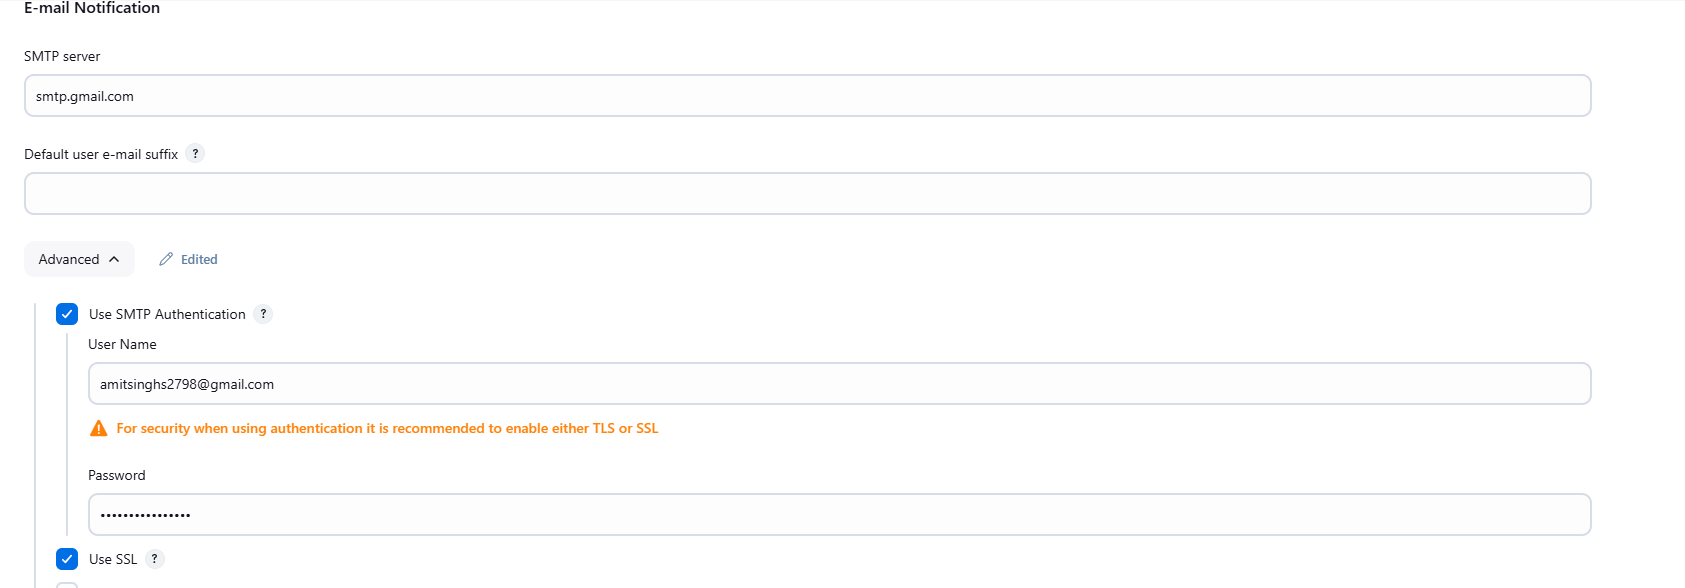
Credentials: Use the Gmail credentials you created earlier.
Enable SSL and OAuth2 for secure communication.
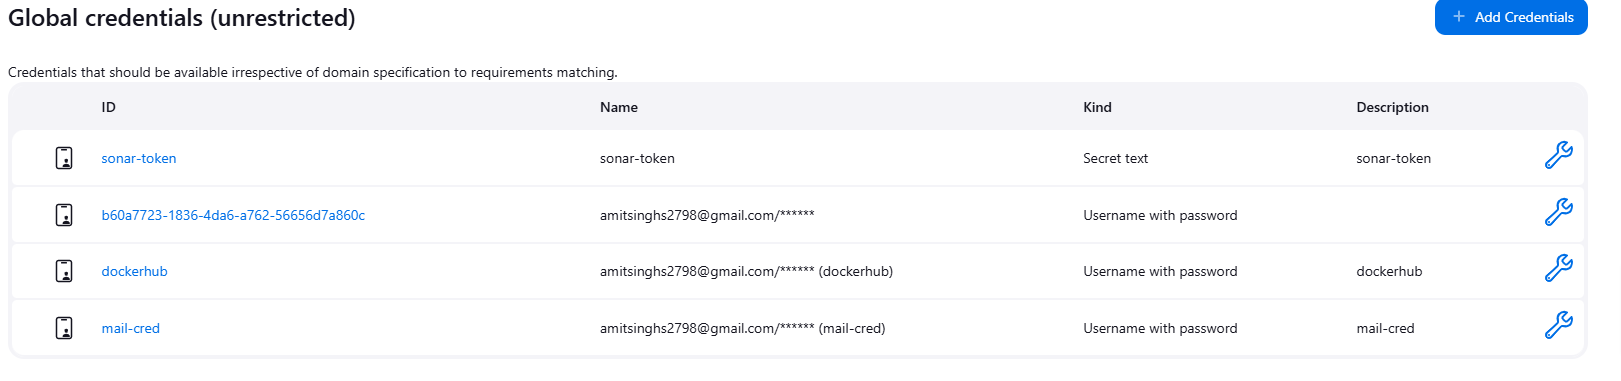
Configure Jenkins Credentials
Navigate to Manage Jenkins > Manage Credentials.
Add the following credentials:
SonarQube Token (authentication token you created earlier).
Docker Hub Credentials (if you're pushing images to Docker Hub).
Gmail Credentials (use your Gmail email address and app password).
Don’t forget to check out github repo: https://github.com/amitsinghs98/starbucks/tree/main
Explanation of the Jenkins Pipeline Script before reading script (helps)
Here’s a breakdown of what each stage does:
Clean Workspace: Clears the workspace to ensure a fresh start.
Checkout Code: Checks out the latest code from the Git repository.
SonarQube Analysis: Runs static code analysis using SonarQube.
Install Dependencies: Installs npm dependencies required for the Node.js application.
OWASP Dependency Check: Scans the project for any vulnerabilities.
Docker Build and Push: Builds a Docker image and pushes it to Docker Hub.
Docker Security Scan: Uses Docker Scout to analyze the security of the Docker image.
Deploy to Docker Container: Deploys the Docker container to run the application.
Notify via Email: Sends an email notification with the build results and any attached logs.
Create Jenkins Pipeline Job
Go to New Item, name the project (e.g.,
Starbucks), and choose Pipeline.Define the Pipeline script. Below is a basic template for your pipeline:
pipeline {
    agent any
    tools {
        jdk 'jdk17'
        nodejs 'node16'
    }
    environment {
        SCANNER_HOME = tool 'sonar-scanner'
    }
    stages {
        stage ("clean workspace") {
            steps {
                cleanWs()
            }
        }
        stage ("Git checkout") {
            steps {
                git branch: 'main', url: 'https://github.com/yeshwanthlm/starbucks.git'
            }
        }
        stage("Sonarqube Analysis ") {
            steps {
                withSonarQubeEnv('sonar-server') {
                    sh ''' $SCANNER_HOME/bin/sonar-scanner -Dsonar.projectName=starbucks \
                    -Dsonar.projectKey=starbucks '''
                }
            }
        }
        stage("quality gate") {
            steps {
                script {
                    waitForQualityGate abortPipeline: false, credentialsId: 'Sonar-token'
                }
            }
        }
        stage("Install NPM Dependencies") {
            steps {
                sh "npm install"
            }
        }
        stage('OWASP FS SCAN') {
            steps {
                dependencyCheck additionalArguments: '--scan ./ --disableYarnAudit --disableNodeAudit', odcInstallation: 'DP-Check'
                dependencyCheckPublisher pattern: '**/dependency-check-report.xml'
            }
        }
        stage("Trivy File Scan") {
            steps {
                sh "trivy fs . > trivy.txt"
            }
        }
        stage ("Build Docker Image") {
            steps {
                sh "docker build -t starbucks ."
            }
        }
        stage ("Tag & Push to DockerHub") {
            steps {
                script {
                    withDockerRegistry(credentialsId: 'docker') {
                        sh "docker tag starbucks amitsinghs98/starbucks:latest"
                        sh "docker push amitsinghs98/starbucks:latest"
                    }
                }
            }
        }
        stage('Docker Scout Image') {
            steps {
                script {
                    withDockerRegistry(credentialsId: 'docker', toolName: 'docker') {
                        sh 'docker-scout quickview amitsinghs98/starbucks:latest'
                        sh 'docker-scout cves amitsinghs98/starbucks:latest'
                        sh 'docker-scout recommendations amitsinghs98/starbucks:latest'
                    }
                }
            }
        }
        //docker
                stage ("Deploy to Conatiner") {
            steps {
                sh 'docker run -d --name starbucks -p 3000:3000 amitsinghs98/starbucks:latest'
            }
        }
    }
    post {
        always {
            emailext attachLog: true,
                subject: "'${currentBuild.result}'",
                body: """
                    <html>
                    <body>
                        <div style="background-color: #FFA07A; padding: 10px; margin-bottom: 10px;">
                            <p style="color: white; font-weight: bold;">Project: ${env.JOB_NAME}</p>
                        </div>
                        <div style="background-color: #90EE90; padding: 10px; margin-bottom: 10px;">
                            <p style="color: white; font-weight: bold;">Build Number: ${env.BUILD_NUMBER}</p>
                        </div>
                        <div style="background-color: #87CEEB; padding: 10px; margin-bottom: 10px;">
                            <p style="color: white; font-weight: bold;">URL: ${env.BUILD_URL}</p>
                        </div>
                    </body>
                    </html>
                """,
                to: 'provide_your_Email_id_here',
                mimeType: 'text/html',
                attachmentsPattern: 'trivy.txt'
        }
    }
}
Testing the Pipeline
Once your Jenkins job is set up, run the pipeline.
Jenkins will execute each stage in sequence.
After the pipeline completes, check your Gmail inbox for the notification.
Conclusion
You now have a fully automated Jenkins pipeline that includes:
Static code analysis with SonarQube.
Dependency checks with OWASP.
Docker image build, push, and security scanning.
Email notifications with build results and logs.
Key Steps Recap:
Jenkins Build: We set up the Jenkins pipeline to automate the build process, integrating tools like SonarQube for code quality checks and OSF SFS for security scans.
Docker Image Creation: We used Docker to build an image for the application and pushed it to Docker Hub.
Docker Scout: We used Docker Scout to analyze the image for vulnerabilities and security risks.
Deployment: The final step was the deployment of the Docker container on an instance and exposing it on port 3000 for public access.
You can try deployment with kubernetes too
pipeline {
    agent any
    tools {
        jdk 'jdk17'
        nodejs 'node16'
    }
    environment {
        SCANNER_HOME = tool 'sonar-scanner'
    }
    stages {
        stage ("clean workspace") {
            steps {
                cleanWs()
            }
        }
        stage ("Git checkout") {
            steps {
                git branch: 'main', url: 'https://github.com/yeshwanthlm/starbucks.git'
            }
        }
        stage("Sonarqube Analysis ") {
            steps {
                withSonarQubeEnv('sonar-server') {
                    sh ''' $SCANNER_HOME/bin/sonar-scanner -Dsonar.projectName=starbucks \
                    -Dsonar.projectKey=starbucks '''
                }
            }
        }
        stage("quality gate") {
            steps {
                script {
                    waitForQualityGate abortPipeline: false, credentialsId: 'Sonar-token'
                }
            }
        }
        stage("Install NPM Dependencies") {
            steps {
                sh "npm install"
            }
        }
        stage('OWASP FS SCAN') {
            steps {
                dependencyCheck additionalArguments: '--scan ./ --disableYarnAudit --disableNodeAudit', odcInstallation: 'DP-Check'
                dependencyCheckPublisher pattern: '**/dependency-check-report.xml'
            }
        }
        stage("Trivy File Scan") {
            steps {
                sh "trivy fs . > trivy.txt"
            }
        }
        stage ("Build Docker Image") {
            steps {
                sh "docker build -t starbucks ."
            }
        }
        stage ("Tag & Push to DockerHub") {
            steps {
                script {
                    withDockerRegistry(credentialsId: 'docker') {
                        sh "docker tag starbucks amitsinghs98/starbucks:latest"
                        sh "docker push amitsinghs98/starbucks:latest"
                    }
                }
            }
        }
        stage('Docker Scout Image') {
            steps {
                script {
                    withDockerRegistry(credentialsId: 'docker', toolName: 'docker') {
                        sh 'docker-scout quickview amitsinghs98/starbucks:latest'
                        sh 'docker-scout cves amitsinghs98/starbucks:latest'
                        sh 'docker-scout recommendations amitsinghs98/starbucks:latest'
                    }
                }
            }
        }
        // Kubernetes Deployment Stage
        stage('Deploy to Kubernetes') {
            steps {
                script {
                    // Assuming you have set the Kubernetes credentials in Jenkins
                    withKubeConfig(credentialsId: 'kubeconfig-credentials') {
                        sh 'kubectl apply -f deployment.yaml'  // Apply your deployment YAML file
                        sh 'kubectl rollout status deployment/starbucks' // Wait for deployment to complete
                    }
                }
            }
        }
    }
    post {
        always {
            emailext attachLog: true,
                subject: "'${currentBuild.result}'",
                body: """
                    <html>
                    <body>
                        <div style="background-color: #FFA07A; padding: 10px; margin-bottom: 10px;">
                            <p style="color: white; font-weight: bold;">Project: ${env.JOB_NAME}</p>
                        </div>
                        <div style="background-color: #90EE90; padding: 10px; margin-bottom: 10px;">
                            <p style="color: white; font-weight: bold;">Build Number: ${env.BUILD_NUMBER}</p>
                        </div>
                        <div style="background-color: #87CEEB; padding: 10px; margin-bottom: 10px;">
                            <p style="color: white; font-weight: bold;">URL: ${env.BUILD_URL}</p>
                        </div>
                    </body>
                    </html>
                """,
                to: 'provide_your_Email_id_here',
                mimeType: 'text/html',
                attachmentsPattern: 'trivy.txt'
        }
    }
}
Deployment.yml
apiVersion: apps/v1
kind: Deployment
metadata:
  name: starbucks
  labels:
    app: starbucks
spec:
  replicas: 3
  selector:
    matchLabels:
      app: starbucks
  template:
    metadata:
      labels:
        app: starbucks
    spec:
      containers:
      - name: starbucks
        image: amitsinghs98/starbucks:latest
        ports:
        - containerPort: 3000
service.yml
apiVersion: v1
kind: Service
metadata:
  name: starbucks
spec:
  selector:
    app: starbucks
  ports:
    - protocol: TCP
      port: 80
      targetPort: 3000
  type: LoadBalancer
We are all set with the project, hope you have liked it.


